Managing Faxes with Cloud Fax
The Fax tile allows you to manage incoming and outgoing faxes, providing a variety of actions that can be performed on these faxes.
Use the dropdowns below to learn more.
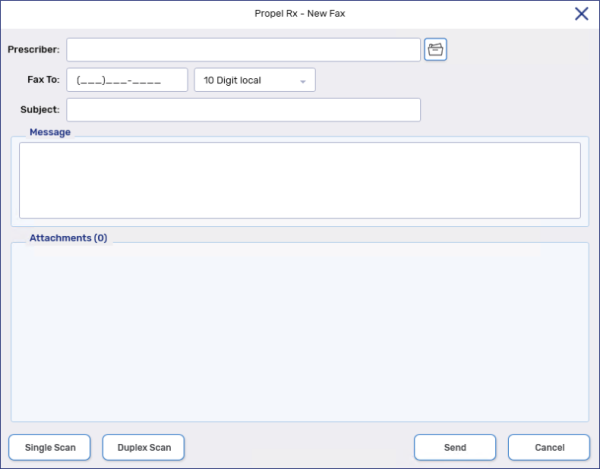
A fax can be generated using the New Fax window.
To create a fax:
-
From the Fax tile, select New Fax. The New Fax window opens.

-
Enter the following information:
-
Prescriber - search for and select one prescriber to send the fax.
-
Fax To - enter the fax number and area code for the recipient. This field is auto-populated if a prescriber is selected. To change the fax number for a prescriber, you must edit the number from the Prescriber Folder.
Only one recipient can be entered in the New Fax window. If you manually entered a fax number, you cannot search for and select a prescriber.
-
Subject - enter the topic for the fax message.
-
Message - enter any details for the recipient. The message body is attached to the document in the Outbox. This field is optional.
-
Attachments - scan any required attachments to send with the fax message.
You can print and scan documents that don't have a built in fax option in Propel Rx.
-
-
Select Send. The fax is moved to the Outbox.
If a fax failed or has no fax number, you can edit the fax number to resend the fax.
To edit a fax number from the Fax tile:
-
Navigate to the Fax tile.
-
Select the Outbox.
-
Select the fax whose fax number you want to edit.
-
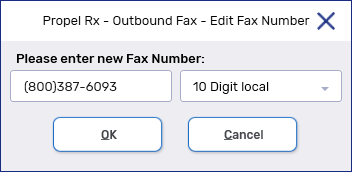
Select Edit Fax #. The Outbound Fax - Edit Fax Number window opens with the current fax number, if it exists.

-
Edit the fax number and select your dialing preference.
-
Select OK. The fax will transition to a Queued status.
A faxed document can be printed by highlighting the fax and selecting Print. If you only want to print the current image in the Image Preview window, select the print button ![]() on the image.
on the image.

Faxes of any status can be resent from the Outbox of the Fax tile. Faxes that are queued for more than two hours are terminated automatically. There is no days limit to resend a fax.
To resend a fax:
-
From the Fax tile, select Outbox.
-
Highlight the fax and select Re-Send. A new row appears for the resent fax in the Outbox.

-
If the fax has already been resent, a prompt appears to inform you of this and the fax is not sent again.
If changes are made to the prescriber's information, a resend will not capture the changes. You must regenerate the fax to send the new details.
Faxes are auto-archived after 30 days in the Inbox or 120 days in the Outbox. A fax in the Inbox can also be archived by highlighting the fax and selecting Archive.

The fax will then display in the Archive section of the Fax tile. Archived faxes cannot be moved back to the Inbox or Outbox but they can still be actioned using the Intake, Attachment, and Print buttons.
A fax can easily be added to a prescription for processing by using the Intake button.
-
From the Fax tile, select Inbox.
-
Highlight the fax and select Intake. The Intake window opens with the fax attached.
Once a fax is moved into the Intake window, it will move to the Archive tab of the Fax tile.
-
Proceed to enter prescription details as per usual process.
For reauthorizations, select the Profile button and use the ReAuth function to quickly enter details into the Intake window. The patient information must be entered before the Profile button is available.
If you Refill a prescription using the Profile button, the fax image is dropped as it is assumed the fax is for a newly authorized prescription. To locate the fax again, go to the Archive tab of the Fax tile.
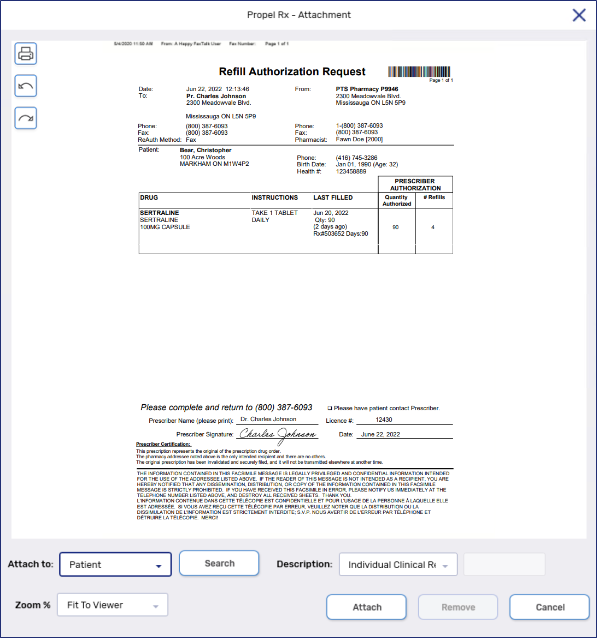
Faxed documents can be directly attached to a patient, prescriber, Group, or prescription. This reduces the need to print the document and re-scan it into correct location of Propel Rx
To attach a faxed document to a patient, prescriber, Group, or prescription:
-
In the Inbox folder of the Fax tile, highlight the fax.
-
Select Attachment. The Attachment window appears.

-
Select the following information:
-
Attach to - select where the faxed document is being attached.
-
Description - select the description of the fax.
-
-
If patient, doctor, or Group was selected from the Attach to dropdown - select Search to search for and select the patient, prescriber, or Group.

-
If prescription was selected from the Attach to dropdown - enter the prescription number in the Rx(s) field.
If the fax should be attached to multiple prescriptions, separate the prescription numbers with a forward slash /.

-
Select Attach.
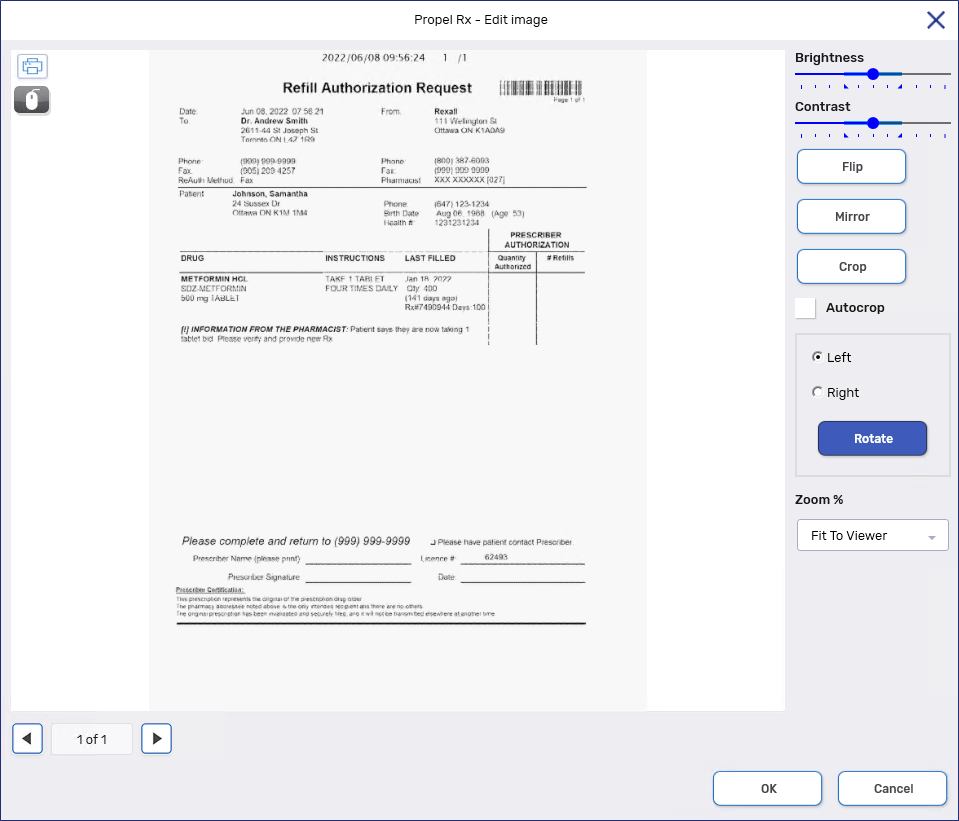
Faxed documents can be edited from the Fax tile. Edits can include adjustments to the brightness, contrast, or orientation of the image. You can also crop the image if needed. Any edits made will be saved and be retained on the image even if it is attached to a prescription, patient, prescriber, or Group.
To edit a fax:
-
In the Inbox, Outbox, or Archive folder of the Fax tile, highlight the fax.
-
Select the pencil icon
 on the image preview. The Edit Image window opens.
There are multiple ways to magnify the image for easier viewing. You can use the Zoom % field, the scroll wheel on your mouse, or change the Mouse Mode by selecting the mouse button
 . There are 3 Mouse Mode options:
Pan: cursor acts like a normal cursor.
Area Zooming: allows you to draw rectangles with your cursor to specify areas you want to zoom in on.
Magnifier: changes your cursor into a rectangular magnifier which can be used to hover over areas you want to see more closely.

-
Select one or more of the following options:
-
Brightness/Contrast - slide the circle left or right to adjust the brightness and/or contrast.
-
Flip - flips the image vertically.
-
Mirror - mirrors the image.
-
Crop - press and hold the left mouse button to draw a rectangle encompassing the area of the image you want to keep. Release the left mouse button to crop the image. Anything outside of the rectangle that you drew will be omitted from the image.
-
Autocrop - automatically crops the image. The default for this preference is off.
-
Rotate - rotates the image left or right.
-
-
Select OK.